
Getting Started with Character Creation
Anyone can create their own characters on Backstage Chat.How to Create a Character
- Log in to Backstage Chat.
- Go to the Create page.
- Select New Character.
- Upload a character image or generate one using AI.
- In Step 1, set up your character’s basic information and personality.
- In Step 2, configure the world, story, first message, and visibility settings.
- Complete the settings and create your character.
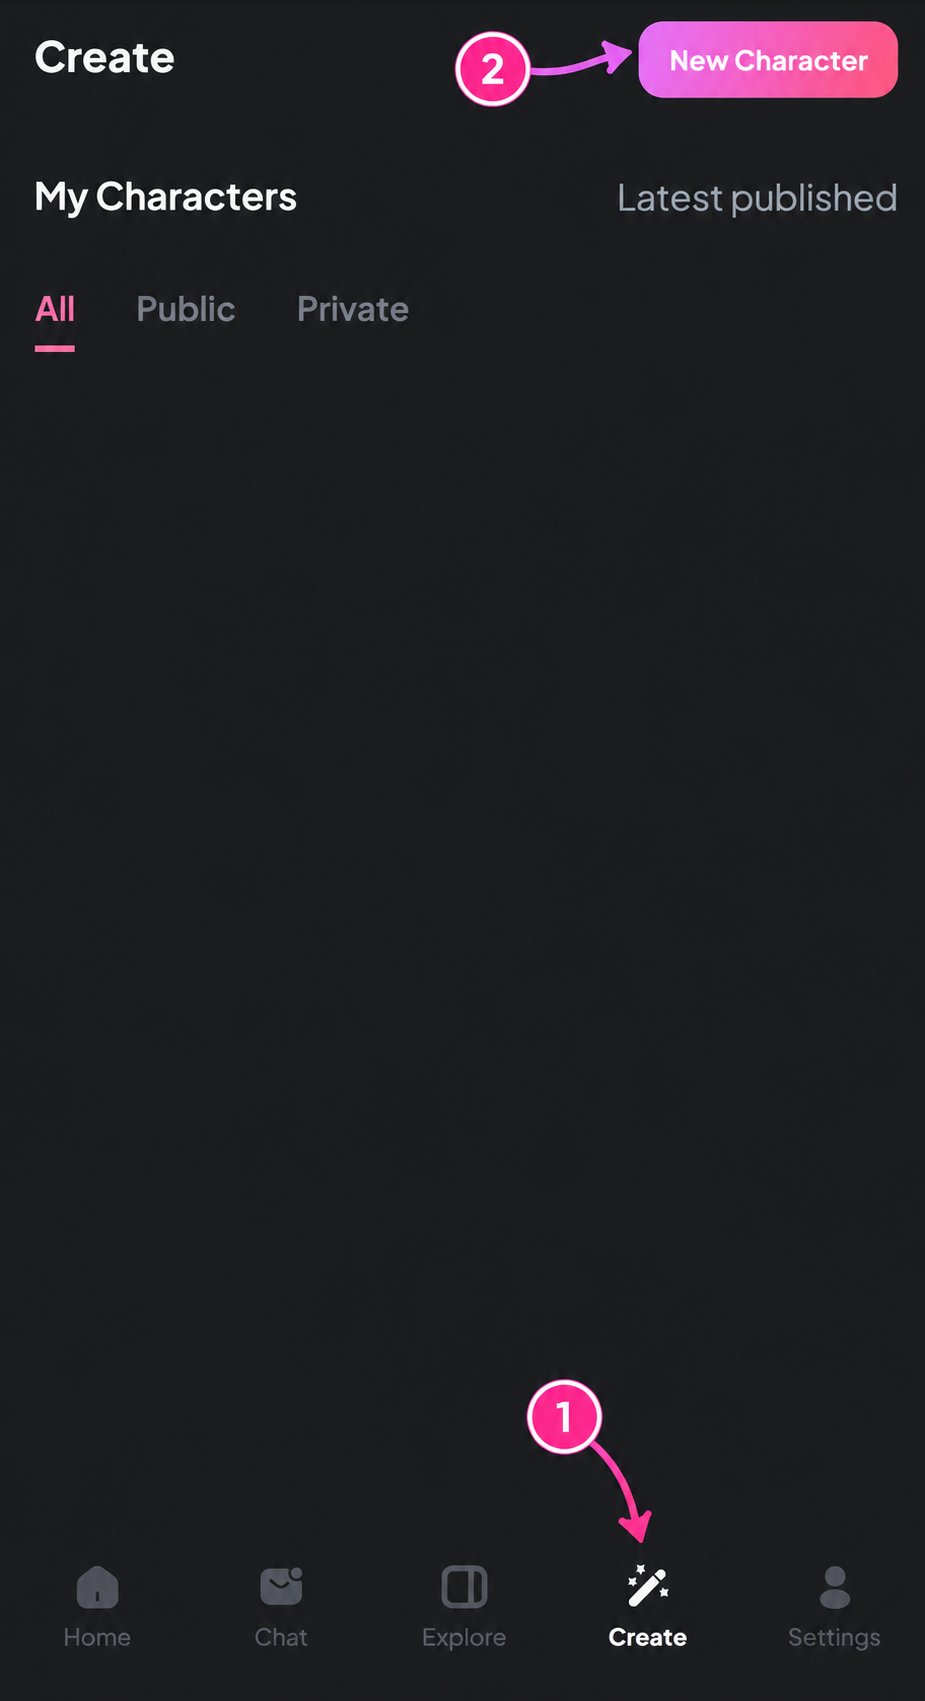
Character creation is also available on the web, so you can create characters without installing the app.
Creator Page: https://backstage-chat.com/creator/Character Images
Your character’s main image is one of the first things users notice when discovering your character. You can upload an image you’ve created yourself or one you have permission to use. Alternatively, you can generate a new image using Backstage Chat’s AI image generator.① How to Upload an Image
- Select the image section on the character creation screen.
- Choose the image upload option.
- Select an image saved on your device.
- Review the uploaded image.
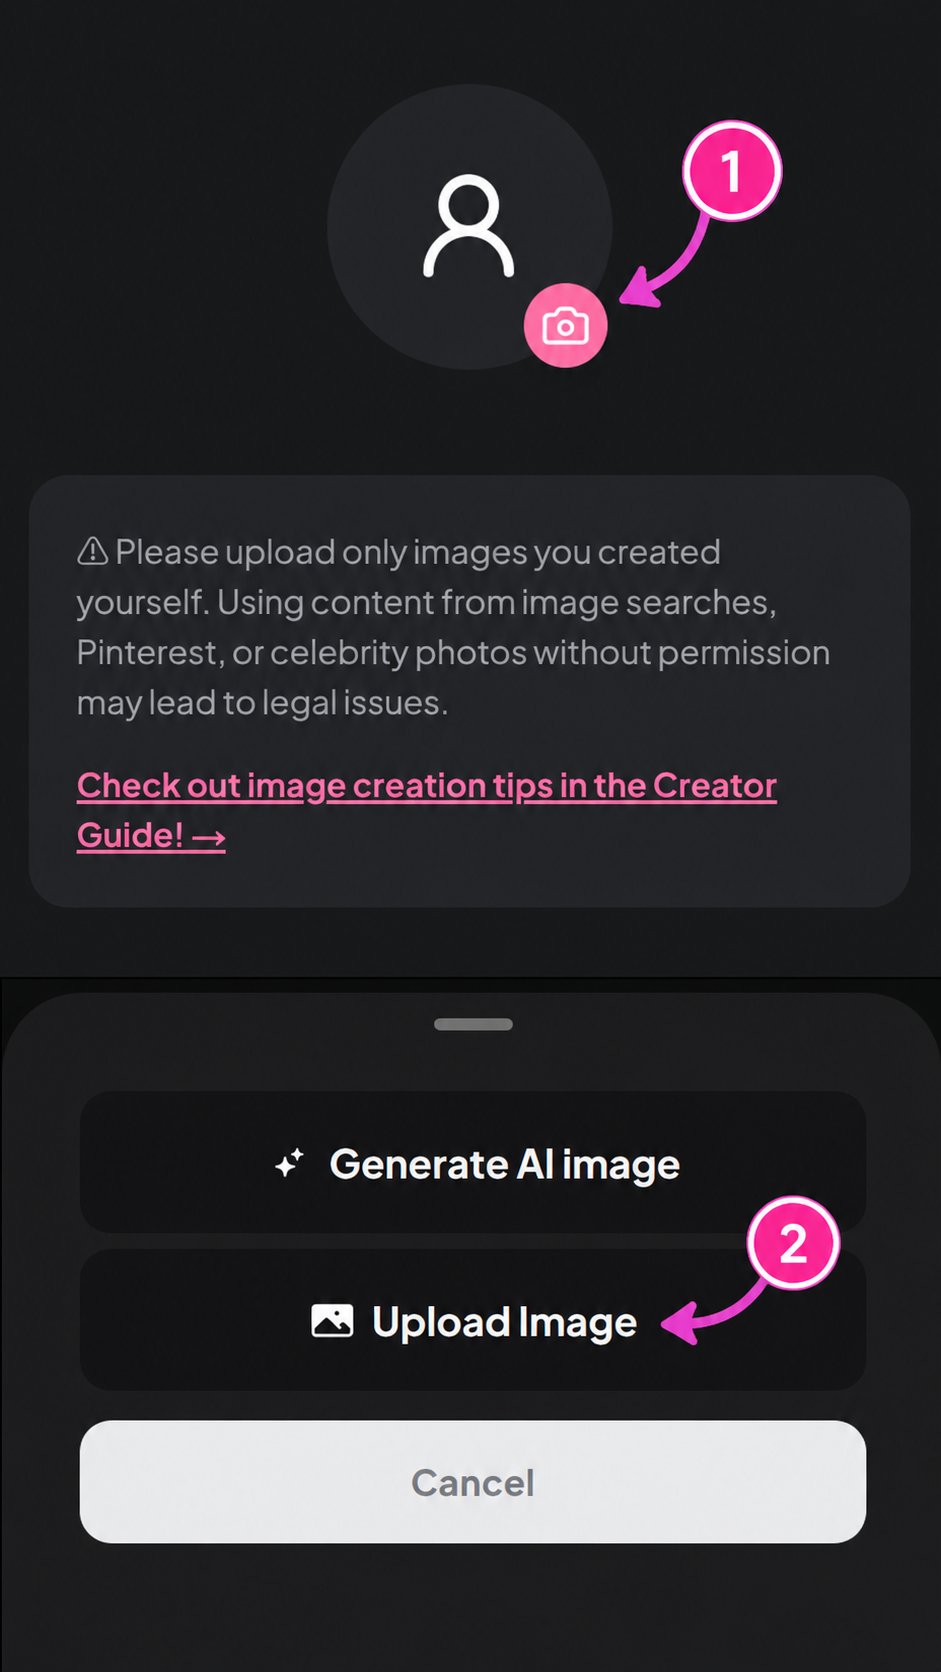
② AI Character Image Generation
If you don’t have an image ready, you can use the Generate AI Image feature to create your character’s appearance directly within Backstage Chat. The AI image generator allows you to describe your character using a text prompt and choose from different visual styles.How to Generate an AI Image
- In the character image section, select the AI image generation option to open Generate AI Image.
- Enter a description of your character’s appearance in the prompt field (up to 1,000 characters).
- Under Choose Style, select your preferred visual style from the available options.
- Click Generate to create your character image.
- Review the generated image and apply it to your character.
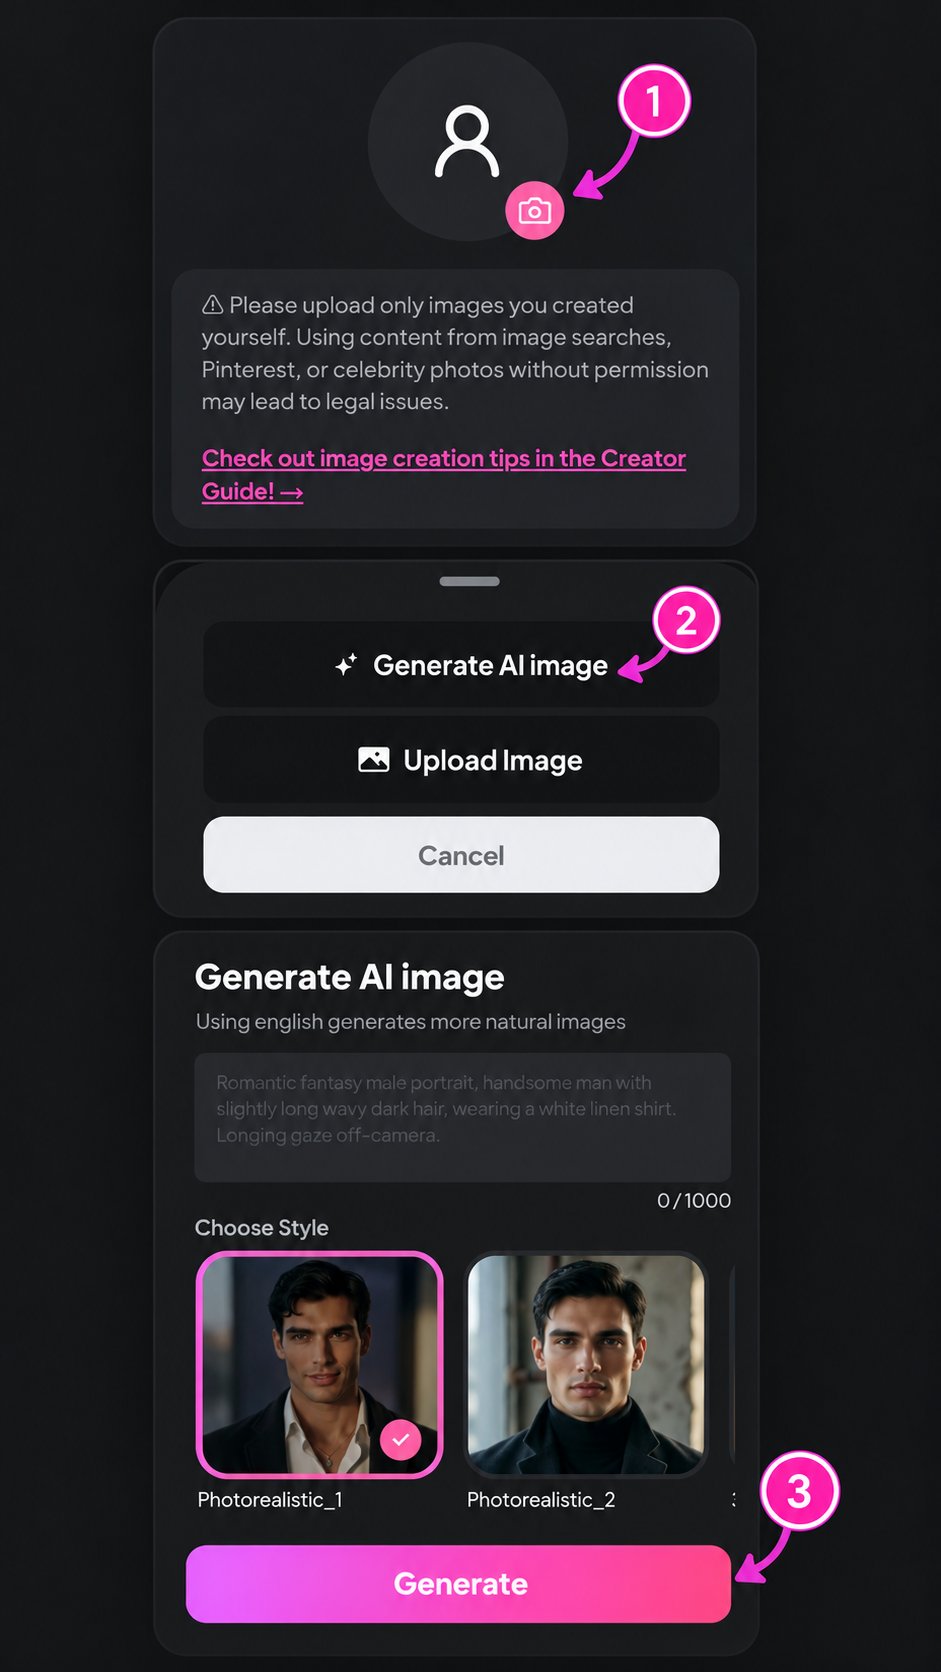
Choosing an Image StyleThe Choose Style section provides different visual styles to help you customize your character’s appearance.Available styles include: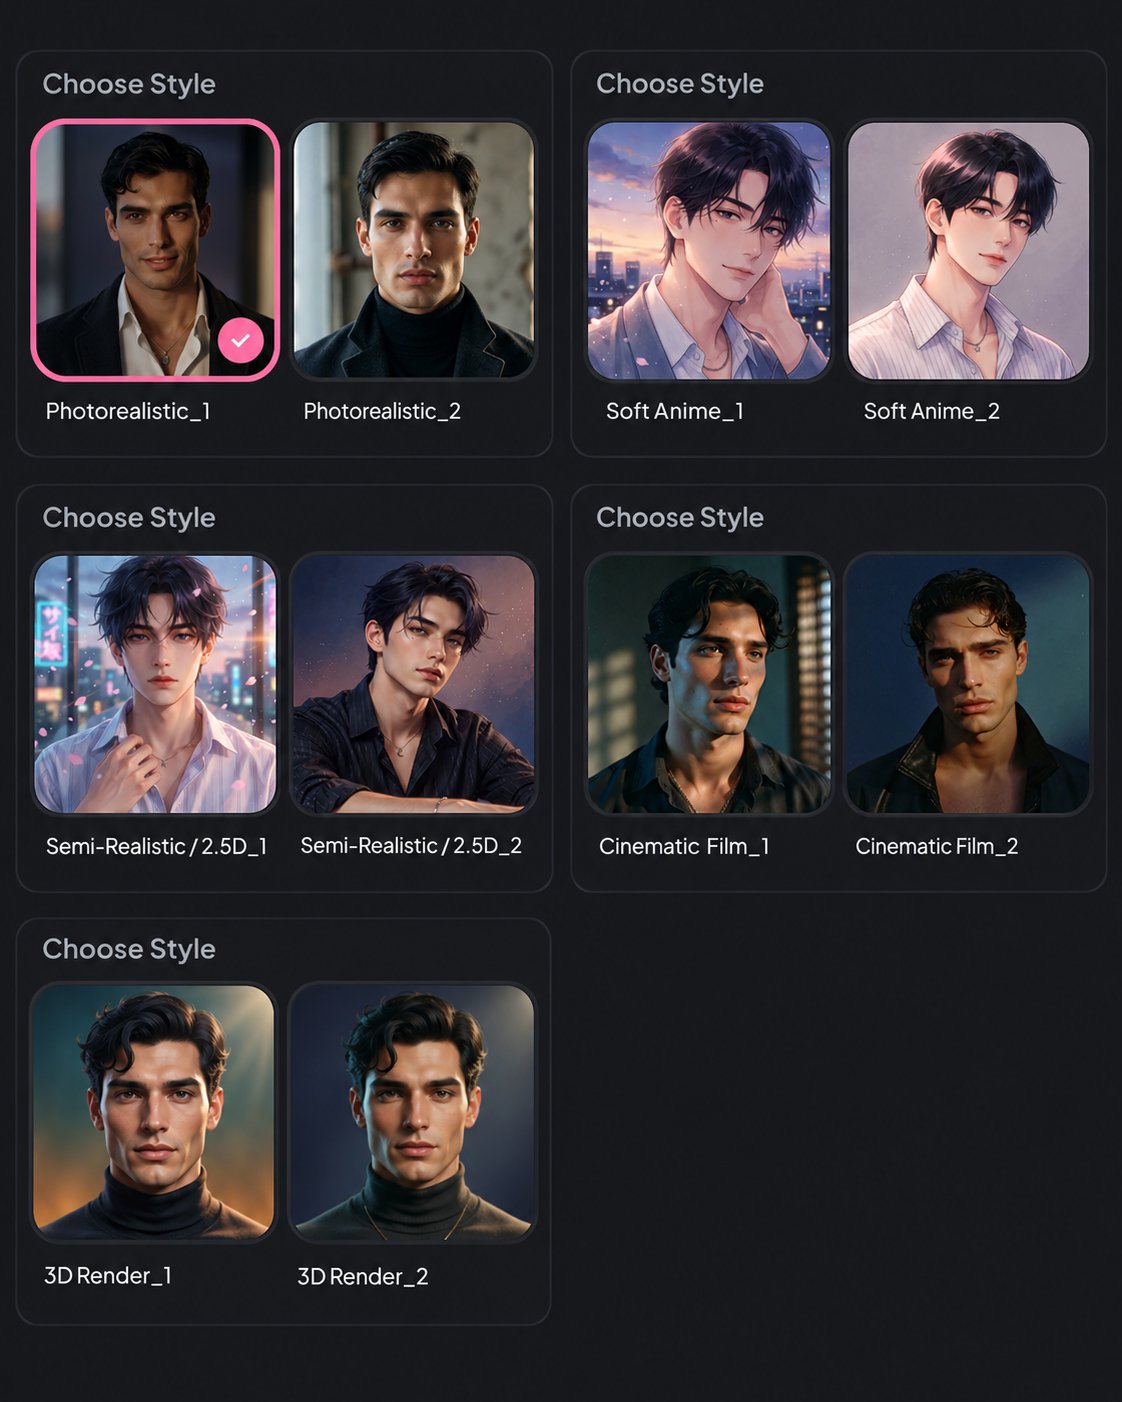
- 3D Render — A stylized, three-dimensional character appearance.
- Photorealistic — A realistic, photography-inspired character appearance.
- Cinema Film — A cinematic, film-inspired visual style.
- Semi-Realistic 2.5D — A blend of realistic features and stylized 2.5D illustration.
- Soft Anime — A soft, anime-inspired illustration style.
Character Name & Profile
In the first step, you’ll enter the basic information that identifies and introduces your character.1
Name
Enter your character’s name. Choose a name that fits the character’s identity and the world they belong to.
2
Bio
**Write a short introduction to your character. Briefly explain who the character is, what makes them interesting, and what kind of story users can experience with them. **
Example:Your new boss is the ex-boyfriend who left you without a word five years ago. And he still hasn't forgotten you.3
Gender
Set your character’s gender.
4
Age
Set your character’s age. If your content includes adult themes, all characters involved must clearly be adults.
5
Occupation
Enter your character’s occupation or role. An occupation can help establish the character’s social position, behavior, and story background.
Examples:CEODetectiveCollege ProfessorBodyguardVampire Hunter
Character Lore
Lore is where you write detailed background information and settings for your character. You can organize information about your character’s past, relationships, values, and defining traits that may be referenced during conversations.What to Include in Lore
- Important events from their past
- Family and relationships with other characters
- Hidden secrets or personal goals
- Beliefs and values
- Important details the character should remember
ExampleJulian grew up as the heir to his family's business empire. He rarely trusts others and considers showing his emotions a weakness. After breaking up with the first person he truly loved in college, he became even more possessive in relationships.Character Personality
Personality settings are important because they influence your character’s speaking style, emotional expressions, behavior, and attitude toward the user during conversations.1
Personality
Define your character’s core personality and behavior.
You can include details such as
- General personality and temperament
- Emotional expression
- Attitude toward others
- Conversation style and tone
- Reactions to conflict
- Behavior toward the user
Example:He appears cold and distant, but he is thoughtful toward people he cares about. He struggles to express his feelings directly and is intensely jealous, though he rarely admits it.2
Power
Define the abilities, influence, or authority your character possesses. These can take different forms depending on your character’s world and role.
Examples:Authority as the CEO of a companySupernatural abilitiesExceptional combat skillsExpertise in a particular fieldSocial status and influence
3
Kink
This section allows you to define your character’s adult preferences and interests in intimate relationships. You can describe the character’s relationship preferences and behavior in intimate situations.
Character Background & Story
In the second step, you’ll define the world your character lives in and the situation where the story with the user begins.1
World
Describe the time period, location, social environment, and rules of the world your character inhabits.
Example:A modern corporate world set in New York City. Power struggles between major companies and complicated personal relationships shape the environment, while the main characters work at the same company.For fantasy, science fiction, or other fictional settings, you can also describe the unique rules and characteristics of that world.2
Story
Define the relationship between your character and the user, along with the situation where their story begins.
Consider including
- The relationship between the character and the user
- Their shared history
- The current situation
- The main conflict
- The event that starts the story
Example:You and Julian dated in college but broke up three years ago. After losing contact, you unexpectedly reunite as an employee and a superior at the same company. Julian is now the company's new CEO, and you've been assigned as his personal assistant.Character Greetings : Intro / First Chat
Intro / First Chat is the first message users see when starting a conversation with your character. It introduces the opening situation through the character’s actions and dialogue.What to Include in the First Message
- The location and situation where the conversation begins
- The character’s actions and expressions
- The character’s opening dialogue
- A situation the user can respond to
ExampleLate at night, only you and Julian remain in the office. He looks up from his paperwork and fixes his gaze on you."Thinking of leaving already? We still have some unfinished business."Chat Example : Character Chat Style
Chat Example is where you provide sample conversations to demonstrate how your character speaks and behaves. You can use this section to define the character’s speaking style, action descriptions, emotional expressions, and conversation flow.What to Include in Chat Examples
- Speaking style and vocabulary
- Sentence length and conversation rhythm
- Actions and facial expressions
- Emotional reactions
- Interaction style with the user
ExampleUser: "Why are you still here?"Character: Julian leans back in his chair with a faint smile. "Because you haven't left yet."User: "Were you waiting for me?"Character: He briefly looks away before meeting your eyes again. "If that's what you want to believe."Character Tags & Categories
Hashtags describe your character’s main traits and genre, helping other users discover characters that match their interests.Hashtags
Choose hashtags that reflect your character’s personality, setting, and story.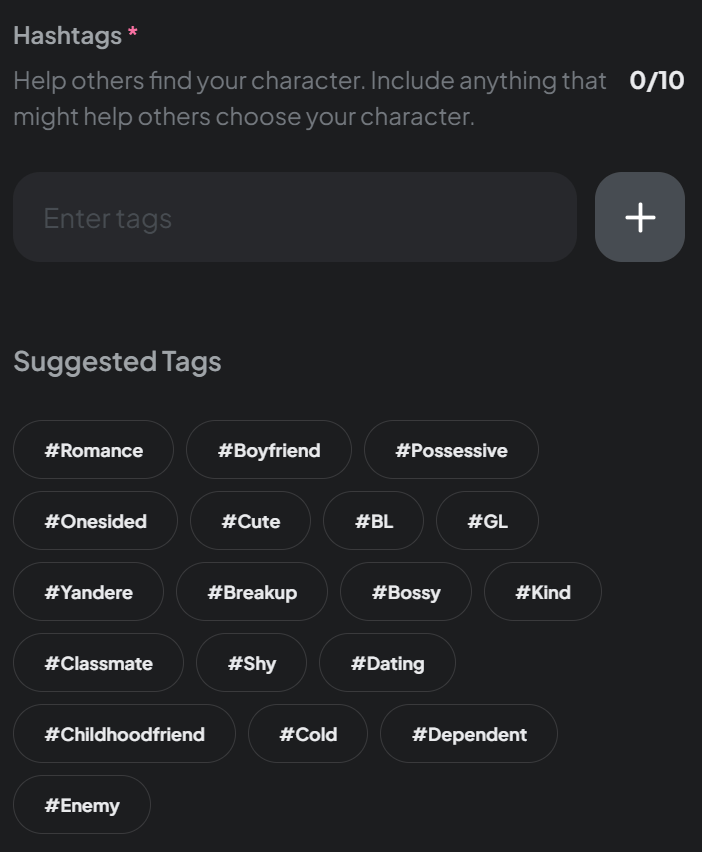
Hashtag Examples
#romance#mafia#roommates#secondchance#slowburn#enemiestolovers#ceo
Character Visibility
Visibility Settings allow you to control whether your character is publicly available.How to Change Visibility Settings
- Find Visibility Settings on the character creation screen.
- Select Public or Private.
- Apply your selection and complete character creation.
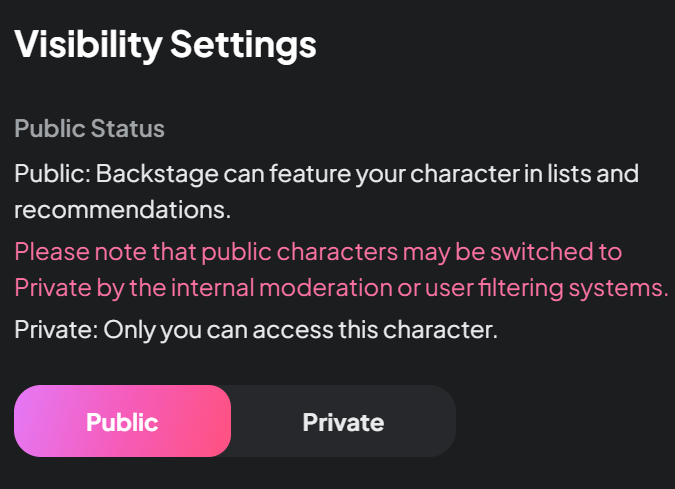
① Public
Makes your character available to other users. When a character is public, other users can discover it and start conversations.② Private
Keeps your character private rather than making it publicly available.Managing Your Character
You can edit or delete your characters even after they have been published.① How to Edit a Character
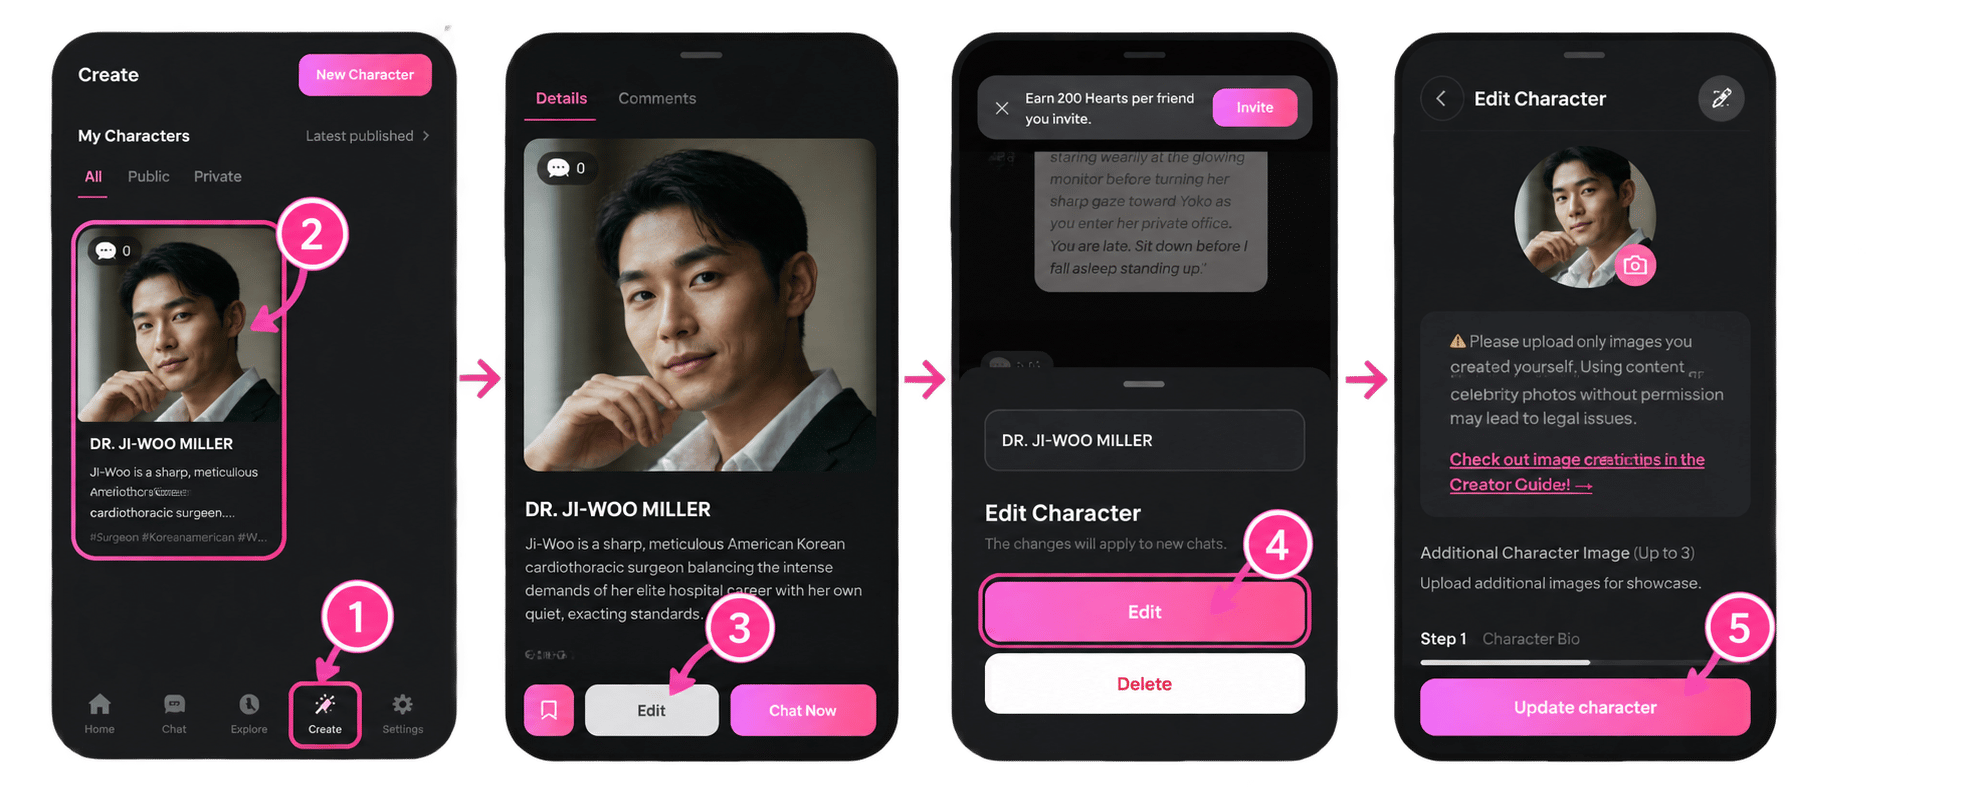
- Go to the Create page and find your character list.
- Select the character you want to edit.
- Select Edit.
- Make the necessary changes.
- Save your changes.
② Deleting Your Character
You can delete characters you no longer wish to manage.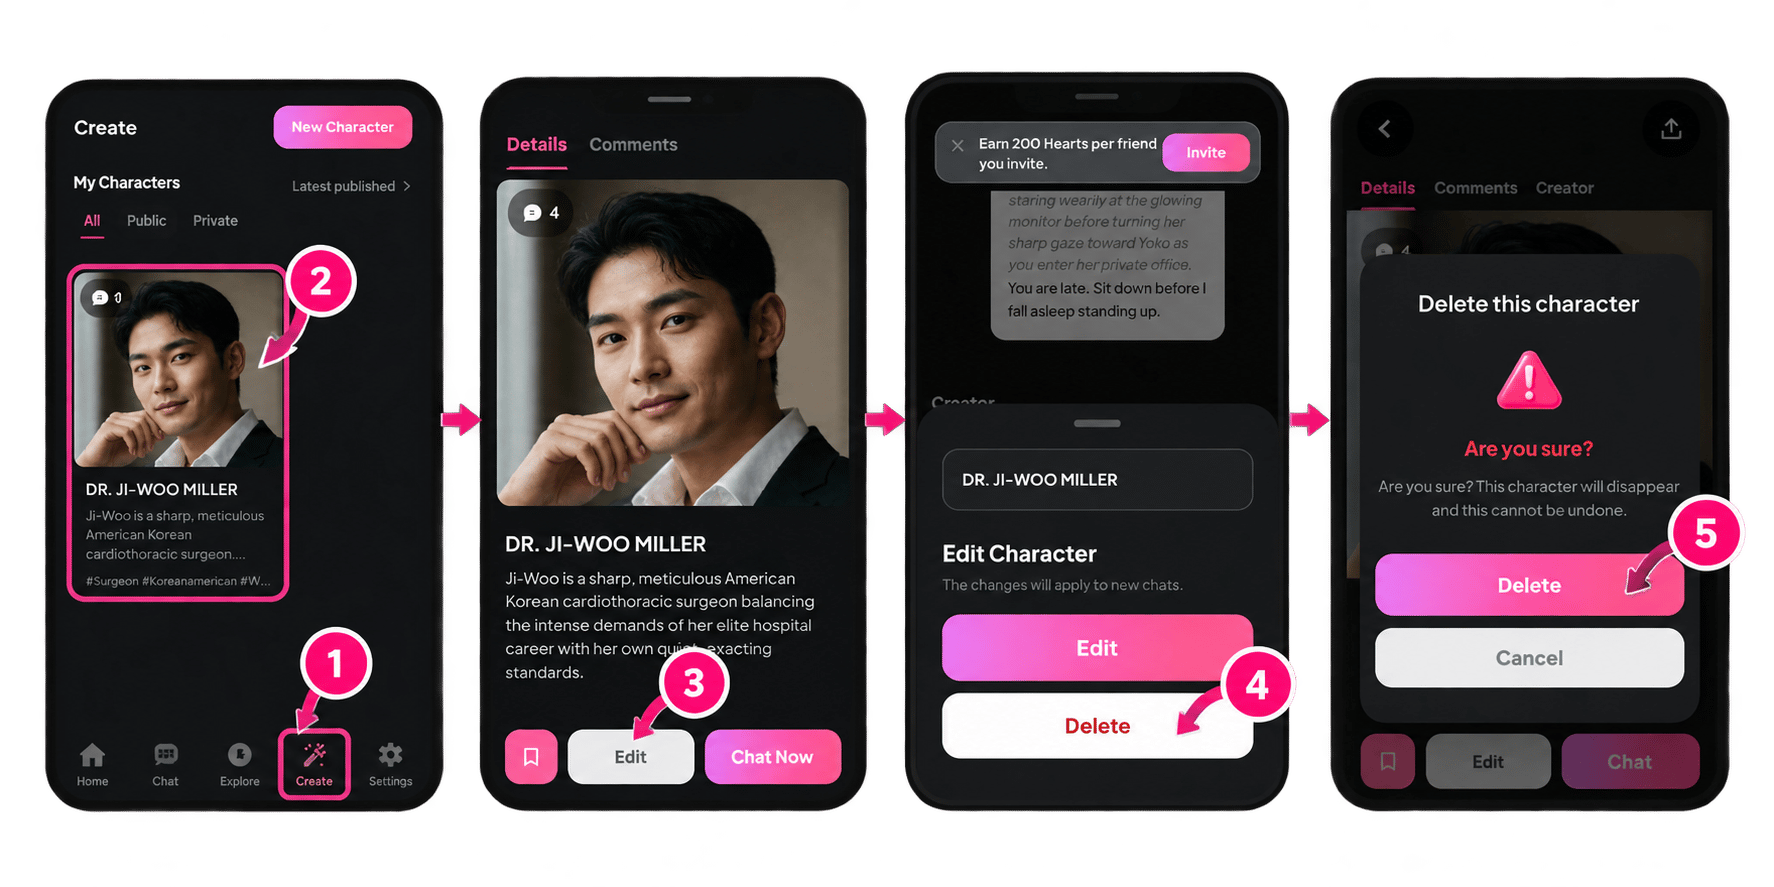
How to Delete a Character
- Go to the Create page and find your character list.
- Select the character you want to delete.
- Select Delete.
- Confirm the deletion.
Before deleting a character, make sure you’ve reviewed any settings or content you may want to keep.
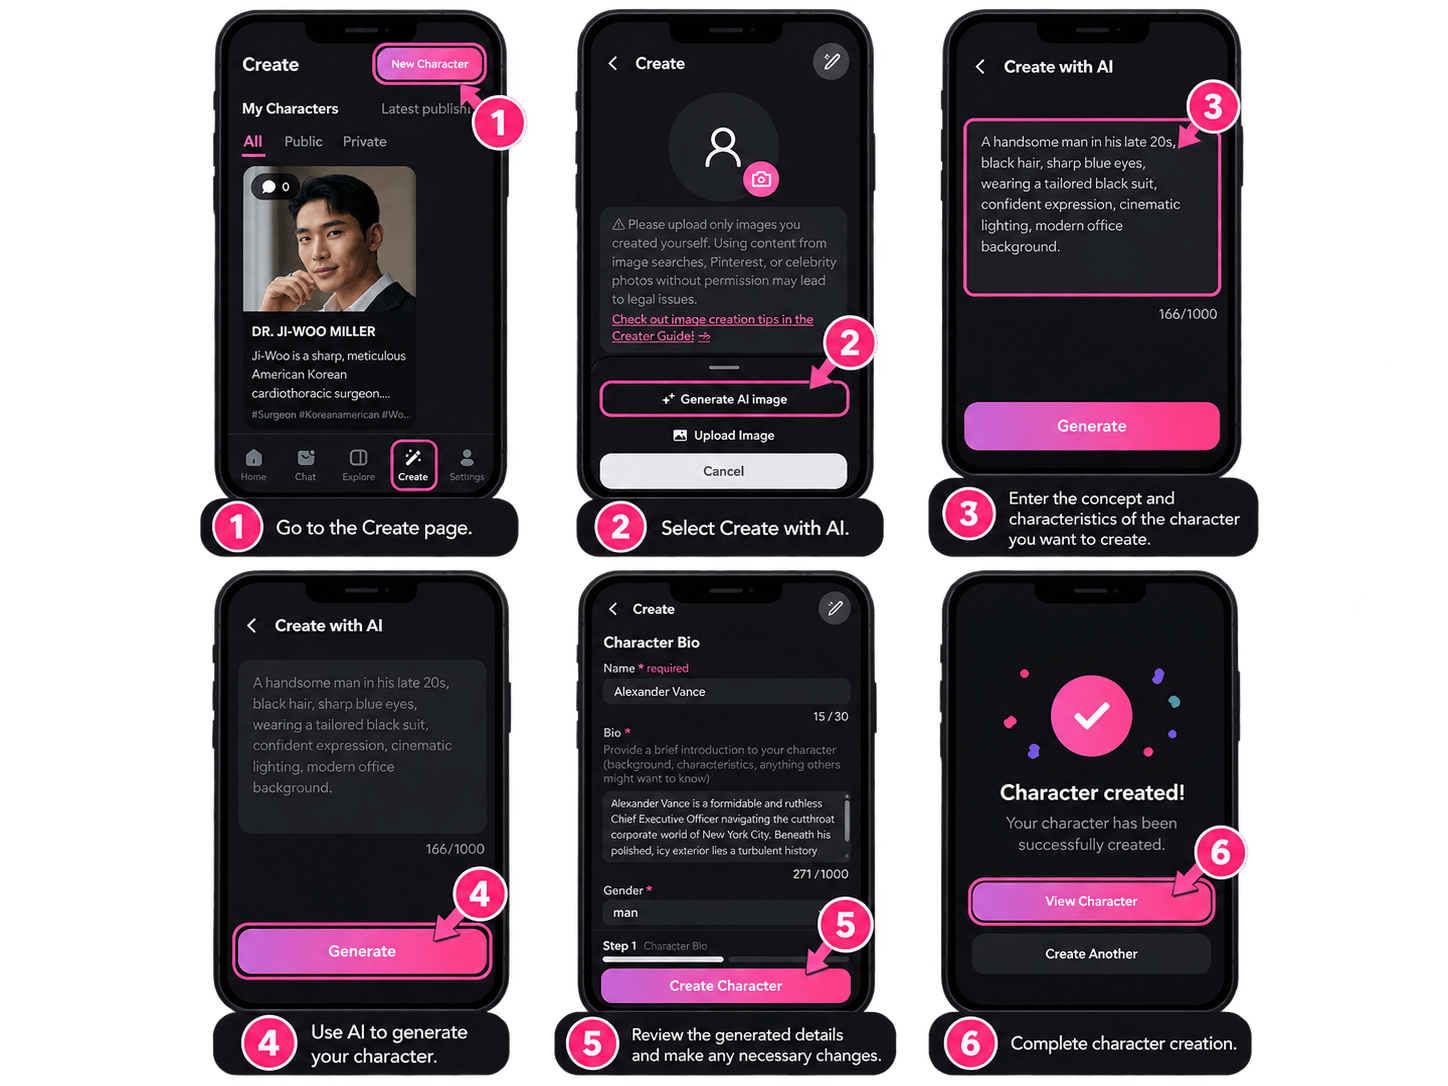
Create with AI
Backstage Chat offers a Create with AI feature that helps you create characters with AI assistance. Instead of writing every setting from scratch, you can begin with a character concept and key traits.How to Create a Character with AI
- Go to the Create page.
- Select Create with AI.
- Enter the concept and characteristics of the character you want to create.
- Use AI to generate your character.
- Review the generated details and make any necessary changes.
- Complete character creation.
Character Creation Tips
An engaging character is more than just their appearance. A distinctive personality and an immersive story can make the experience more memorable.① Establish a Clear Character Identity
Make sure your character’s name, personality, occupation, and past experiences fit together naturally.
② Define the Relationship with the User
Whether the user is meeting the character for the first time, reconnecting with an old friend, or encountering a former lover can shape how the conversation begins and develops.
③ Keep World and Story Separate
Use World to describe the environment where your character exists, and Story to focus on the relationship and events between the character and the user.
④ Start with an Interesting First Message
Use actions and dialogue that highlight your character’s personality and give users a natural reason to respond.
⑤ Use Chat Examples to Define Speaking Style and Behavior
Instead of relying only on personality descriptions, include sample conversations that demonstrate how your character speaks and acts.
⑥ Test and Improve Your Character Through Conversations
After creating your character, try chatting with them to review their personality, speaking style, and story flow. Make adjustments where needed.